Thanks to all the customers who have bought this wonderful script and those who are pending to buy, we are in permanent updates which you will have for free, and above all we are attentive to your questions and concerns, thank you for choosing us.
Shipping and delivery EASYPACK CARGO is an advanced native php system that is used to manage your packages from anywhere in the world, ordering them exactly with synchronized and live information, we also have a very powerful personal and company customer record form which allows to classify customers, we also have a normal shipments and multiple shipments, advanced reports.
What is included in the purchase?
- All files and database
- 1 free installation (optional)
- Valid lifetime license
What does the support include?
- Author's availability to answer questions
- Answer to technical questions about the characteristics of the article
- Help with reported bugs and problems
What does not include the support?
- Script customization service, such as modifications or additions of new modules
Easypack - Shipping & World Delivery
Thanks to all the customers who have bought this wonderful script and those who are pending to buy, we are in permanent updates which you will have for free, and above all we are attentive to your questions and concerns, thank you for choosing us.
Shipping and delivery EASYPACK is an advanced native php system that is used to manage your packages from anywhere in the world, ordering them exactly with synchronized and live information, we also have a very powerful personal and company customer record form which allows to classify customers, we also have a normal shipments and multiple shipments, advanced reports.
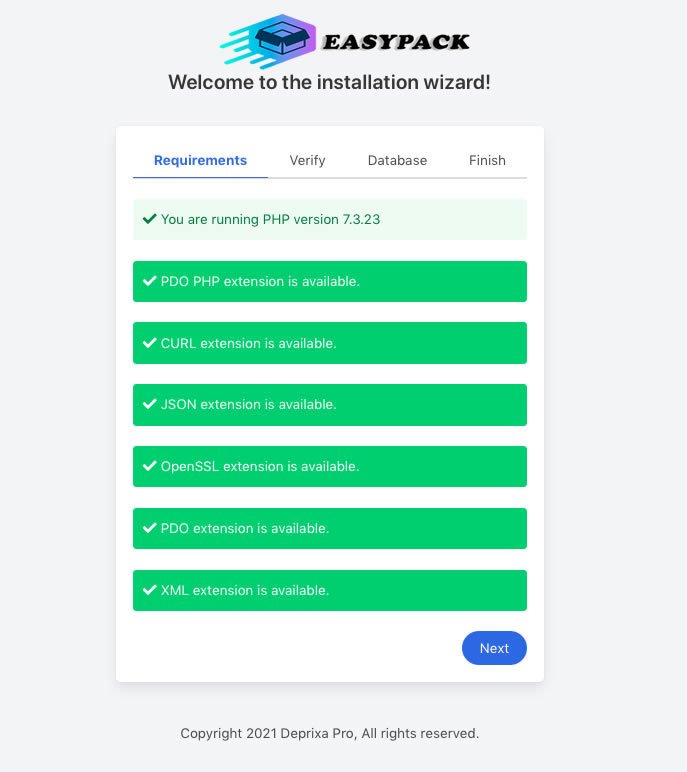
Easypack is developed with the latest technology, making it stable on any server, as long as it meets the required requirements.
PDO is the acronym in English for PHP Data Objects. And functionally speaking, it is the set of native PHP functionalities that allow us to fluidly handle connections and manipulate data from a database engine.
Deprixa pro is developed in this beautiful native PHP and PDO programming language, therefore some extensions are not activated in most local and web servers and it is important to take into account the following extensions so that the Deprixa pro script works correctly:
Create database
Create a MySql Database via your web hosting providers Control Panel (e.g. cPanel). Once you have created the database, remember the following information:
- Database Name
- Database Username
- Database Password
- Database Host
Download files
You must enter your account in codecanyon and download the Deprixa pro file.
Upload files
Using FTP Client or directly on your server you upload all the files in the application folder
Very important
- File permission:
- helpers/.lic File Permission (chmod 7777) -->give permission to this file when you finish the installationgive permission to this file when you finish the installation
- helpers/license_lb_helper.php File Permission (chmod 7777)
Step-by-step installation
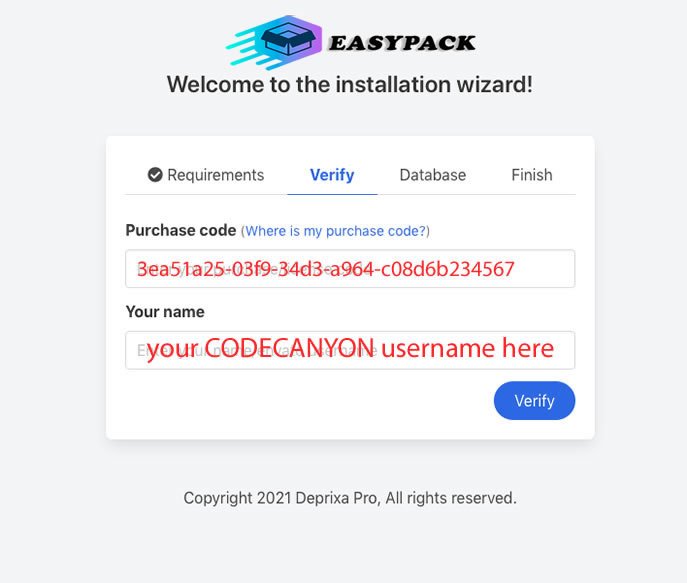
- STEP 1: Open your web browser and enter your url (http://yourdomain.com) or if files is in your sub directory enter your url with directory name like http://yourdomain.com/folder in the address bar.
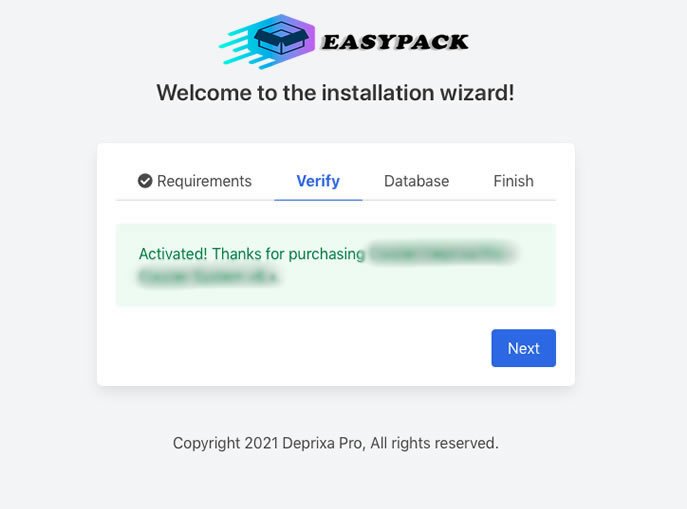
- STEP 2: It is important to enter your CODECANYON account and download the txt or pdf file to copy the purchase code and activate your DEPRIXA PRO product.
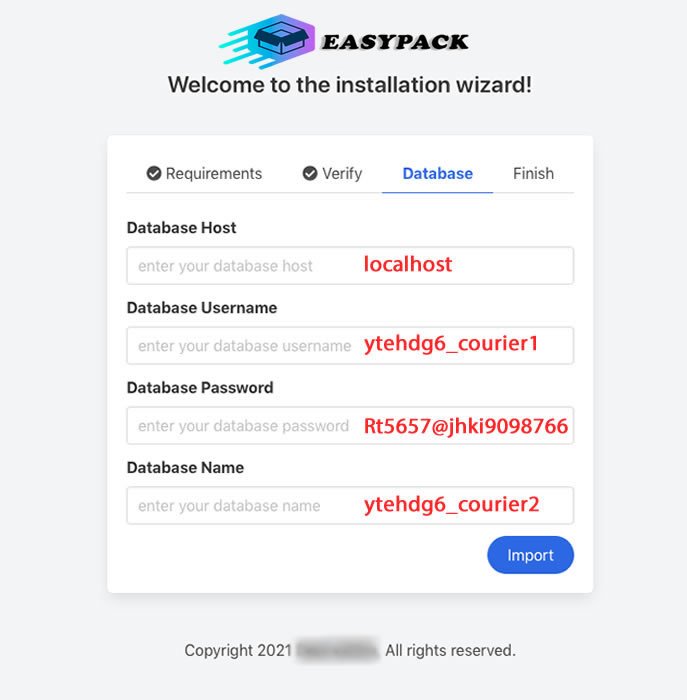
- STEP 3: With the database already created, enter the corresponding information provided by your web server or localhost.
You must allow all privileges when creating the user for the database.
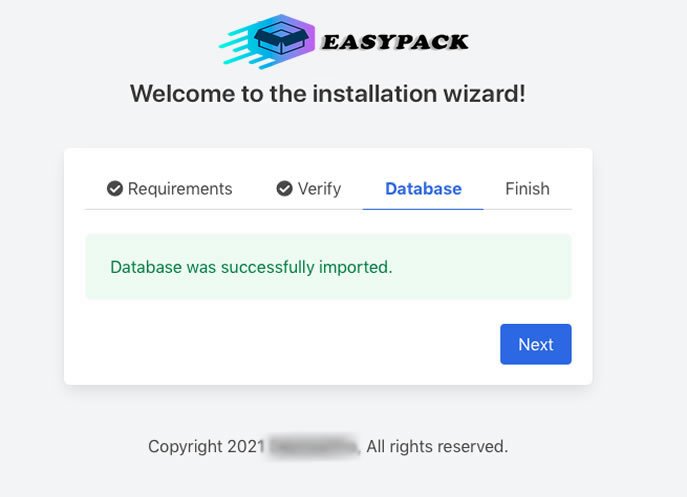
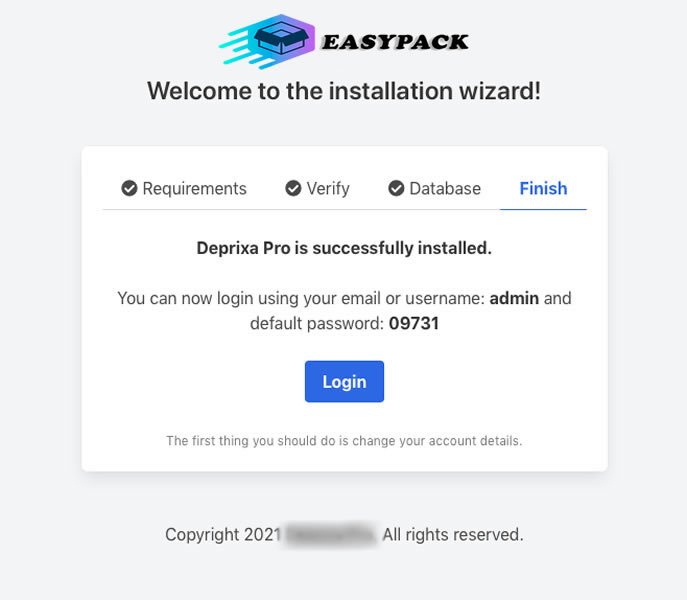
When entering all your correct data you give the import button and automatically all the database tables are installed and by default the USER and PASSWORD are the following
- USERNAME: admin
- PASSWORD: 09731
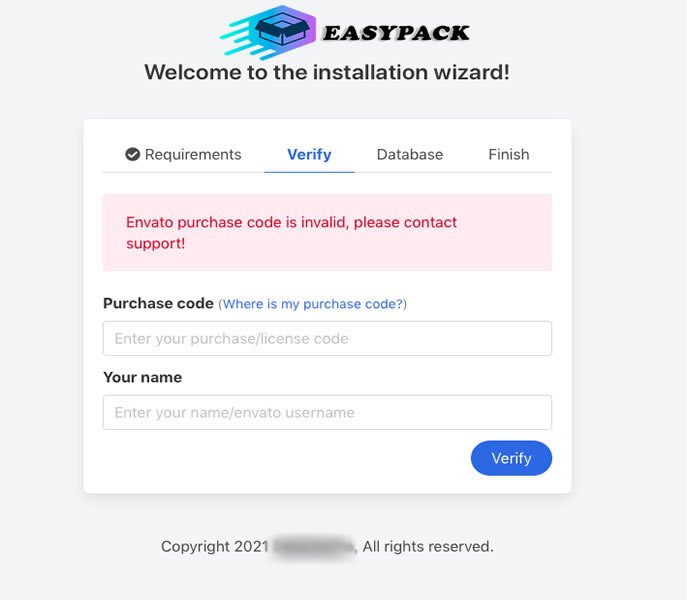
Envato purchase code is invalid, please contact support!
When this error occurs there may be several possibilities and they are the following.
- Wrong purchase code and user
- Invalid or blocked purchase code
- Invalid or bad codecanyon user
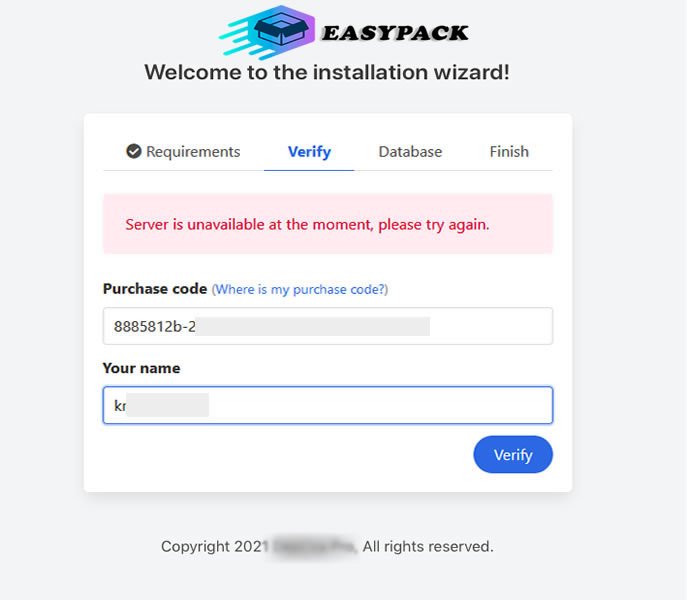
Server is unavailable at the moment, please try again
When this error occurs there may be several possibilities and they are the following.
- When the verification connection is generated the internet is slow
- The ip address of the client's server has some blockage for security, you should ask your hosting provider for help
- Some servers in specific countries the servers have blocks from other countries that do not allow connection to verify APIS, in this case you should ask your hosting provider for help to remove that restriction.
The web servers have 2 IP's must be blocked or they have no restriction
General company settings
PHPMailer offers many functionalities over the PHP core function mail(), including SMTP SSL encryption and authentication, HTML messages, file attachments and more.
On top of that, PHPMailer is much easier to use than mail() and provides a clean, readable object-oriented syntax.
Using PHPMailer with Hostinger SMTP
Once you have DEPRIXA PRO installed on your web server you can use the SMTP function as follows:
- STEP 1: Create an email account by accessing your hPanel, then go to Email account -> Create a new Email account. Fill in the new email address and set a password before clicking Create.
- STEP 2: When you're done, pay attention to your SMTP data located in the same section:
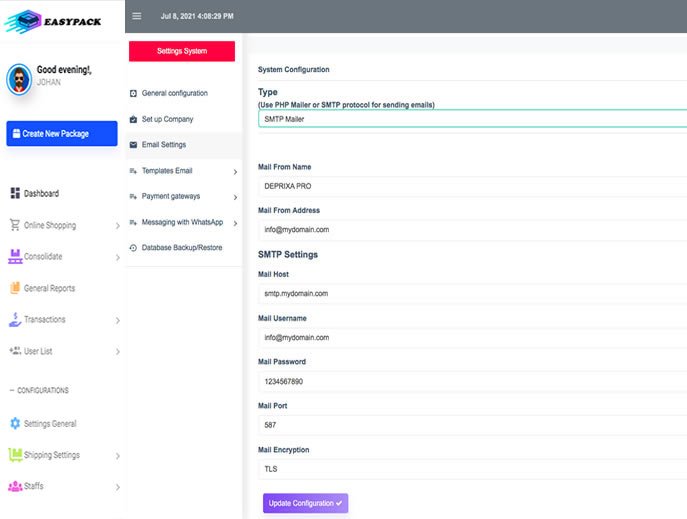
SMTP mail configuration details
SMTP mail configuration details
- Mail address: support@domain.com
- Email password: 1234567889
- Mail Host: smtp.domain.com
- Mail Port:Recommended 587
- Mail Encryption:Recommended TLS
To get the Client ID and the Secret Key from Paypal you need a Paypal account
- STEP 1: Open the following website and click on "Log into Dashboard".
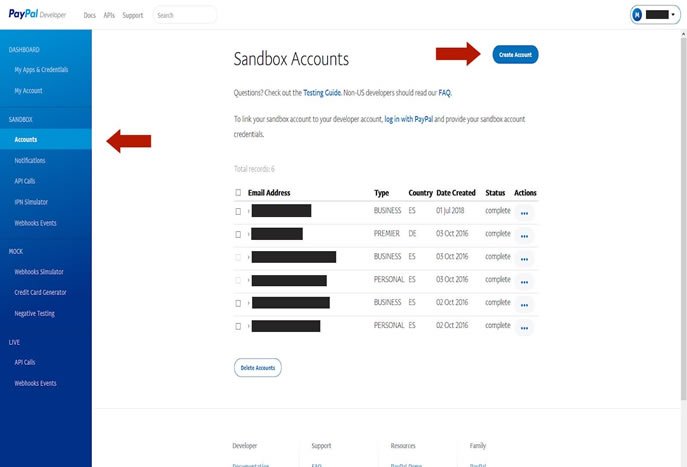
Create Developer (Sandbox) account
- STEP 2: After you have logged in, create a Sandbox Business Account to be able to make test payments later.
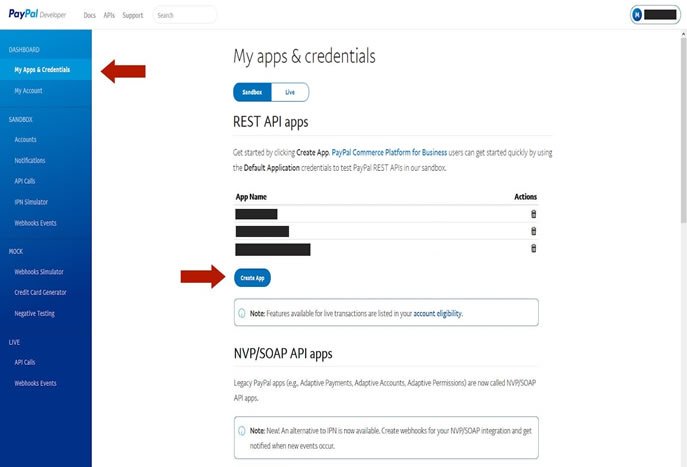
Create Paypal App
- STEP 3: If you have created a sandbox account, click on "My Apps and Credentials" in the menu on the left and then on "Create App".
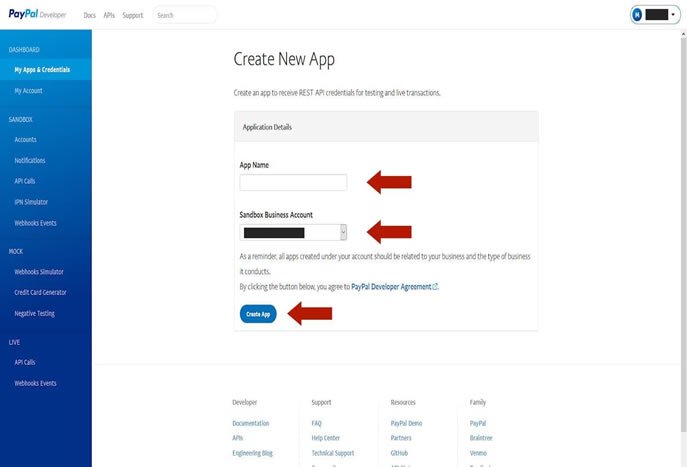
- STEP 4: Give your Paypal app a name and choose your previously created developer (sandbox) account. After you have finished, click on "Create App".
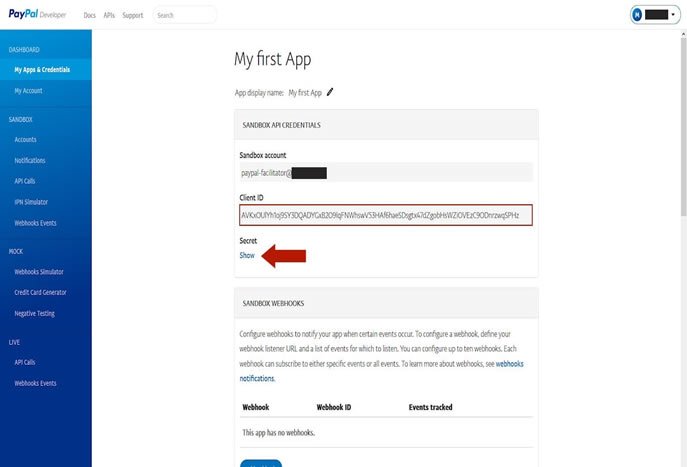
Paypal App Client ID and Secret Key
- STEP 5: As soon as the app is created, the details of the app you just created will open. You should now see the Client ID and an option (Show) below to see the Secret Key.
- STEP 6: To switch between Live and Sandbox click first on "My Apps & Credentials" in the left main menu then click on Live or Sandbox and then on the desired app you want to know the Client and Secret keys. Note that Sandbox and Live have different Client IDs and Secret Keys.
To get the Publishable Key and the Secret Key from Stripe, you need an account at Stripe (www.stripe.com).
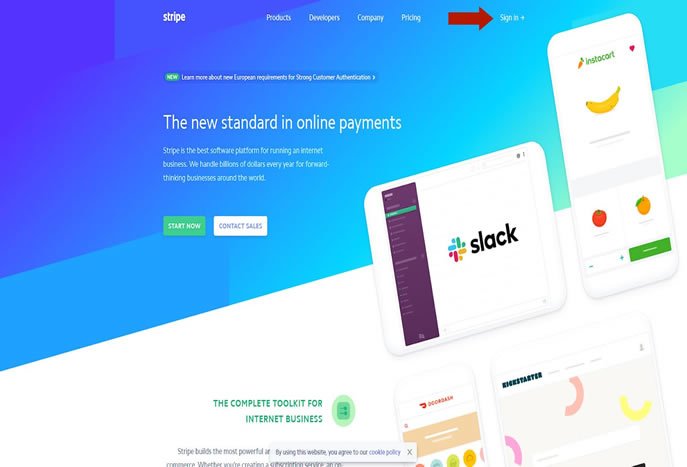
- STEP 1: Open the following website and click on "Sign in".
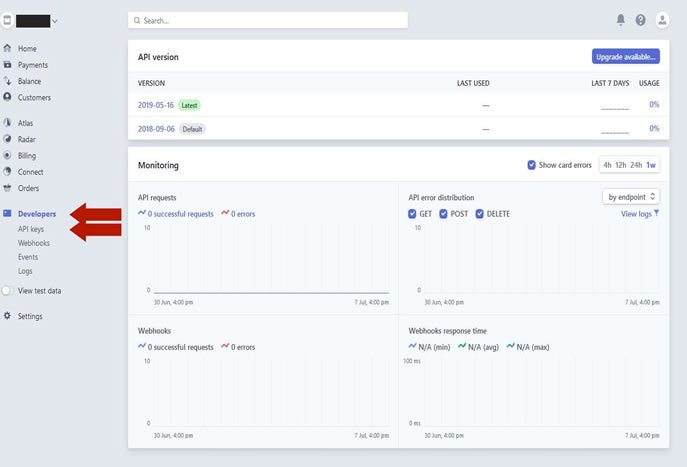
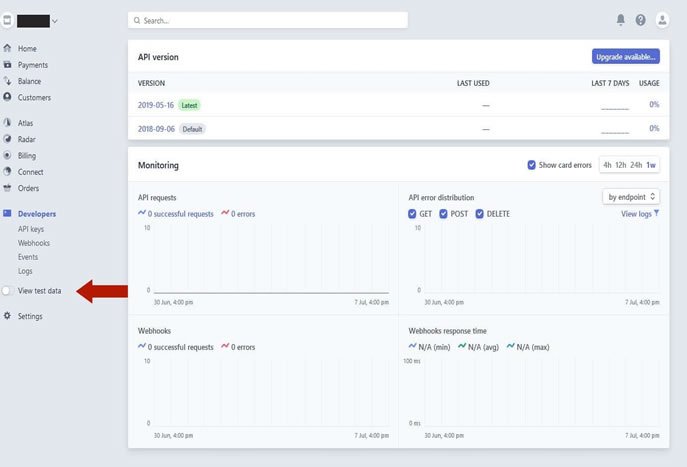
- STEP 2: Now that you have logged in to Stripe, the dashboard opens. In the left menu, first click on "Developers" and then on "API keys".
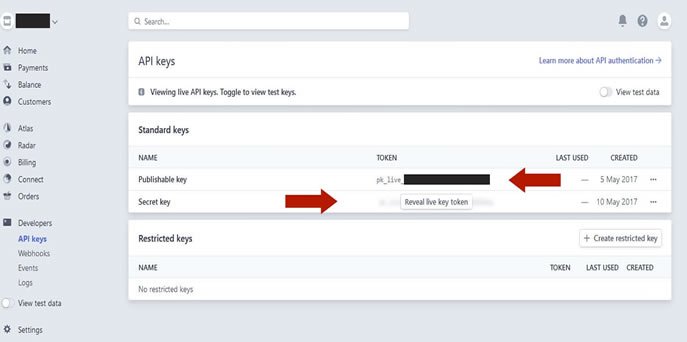
Retrieve Publishable Key and Secret Key
- STEP 3: Once you have clicked on "API keys", the page with the API keys opens. Under Standard Keys you will see the Publishable Key and above the Secret Key there is a button "Reveal live key token". Now click on it to display the secret key.
Sandbox and Live mode
- STEP 4: To switch Stripe to the Sandbox (Test Payments) mode or Live (Real Payments) mode, click on "View test data" in the left menu. Note that Sandbox and Live Mode have different keys.
Important to Note
When you sign up on Paystack, we encourage you to test out our platform, so you can fully understand the payment flow before activating your account. This is why we have the Test Mode available. In Test Mode, you can carry out transactions using a test card or bank account that is provided on the test payment page.
How To Get Your Live API Keys
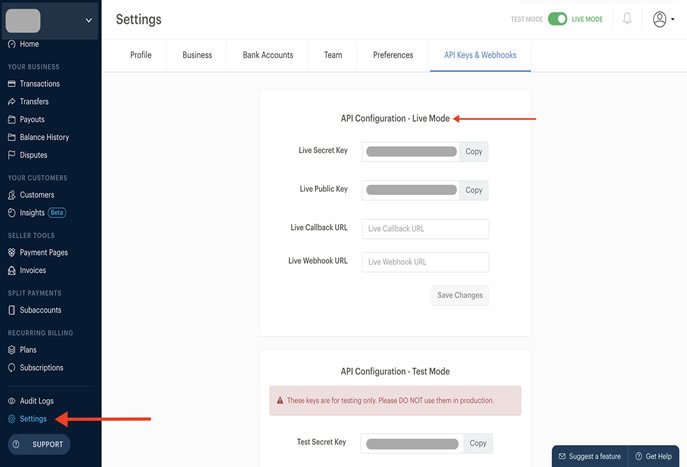
- STEP 1: In order to get your Live API Keys, simply go to your dashboard settings and click on the . Scroll to where it says "API Configuration - Live Mode", here you will find your Live Secret Key and Live Public Key as captured below:
Important to Note
-
You can only toggle to "Live Mode" if your account has been activated. Please follow to learn more about how to activate your Paystack account.
What is the Callback URL?
- STEP 2: The callback URL is a web address of where you want your customers to be redirected to after a successful payment is made. This could be your social media page, your website - you can even redirect them to send you a message on Whatsapp! If you would like to set up a callback URL simply paste the link in the appropriate callback URL field.
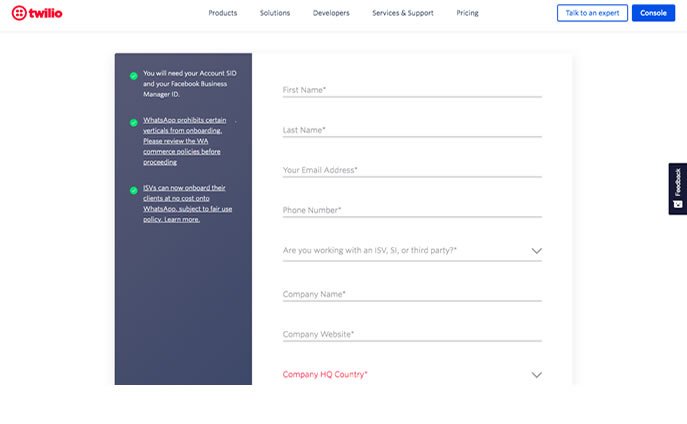
Request to enable your Twilio numbers for WhatsApp
To start using WhatsApp Business API with Twilio in production, you need to enable your Twilio numbers for WhatsApp. We’ll use the information in the form below to assist you with onboarding.
You will need your Facebook Business Manager ID to initiate a request authorizing Twilio to message on your behalf. for details on how to get this info.
To learn more about the WhatsApp onboarding process, please refer to our . Please note that WhatsApp has final discretion to approve companies to use the API.
Note: ISVs and SIs must follow a separate process. .
Create a free account on Twilio
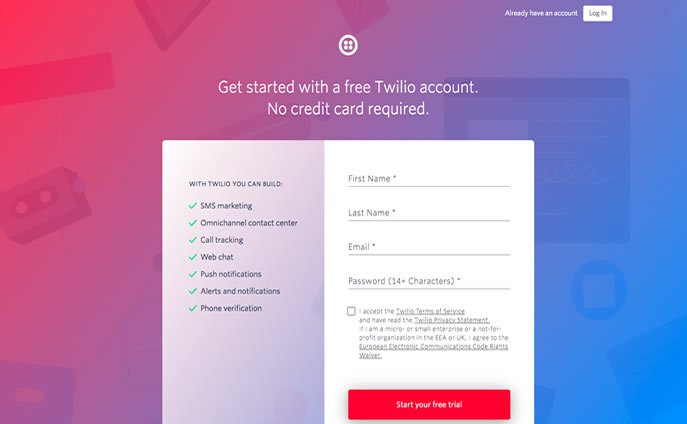
- STEP 1: It is important to have a valid email account to create your account in Twilio, please enter the following link to register .
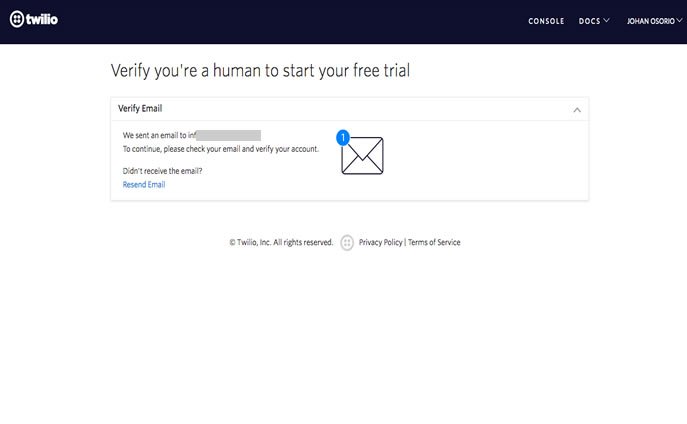
Verify you´re a human to start your free trial
- STEP 2: It is important to enter your email account that you provided when registering with twilio and there activate your free twilio account.
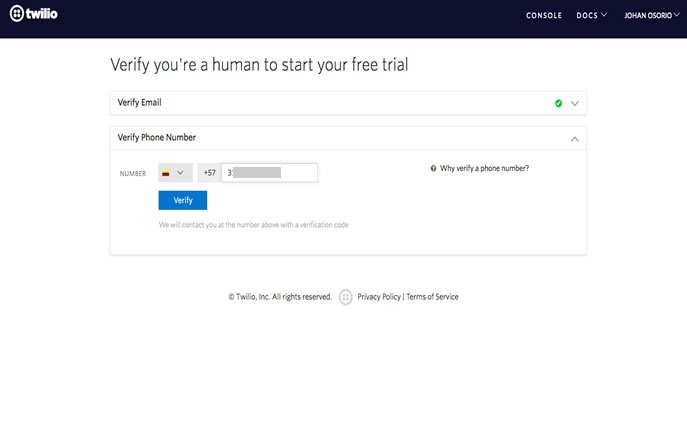
Verify you´re a human to start your free trial
- STEP 3: It is important to enter your cell phone number and verify it with twilio. In this way, you must go to a text message and enter the code sent and your cell phone number will be activated correctly.
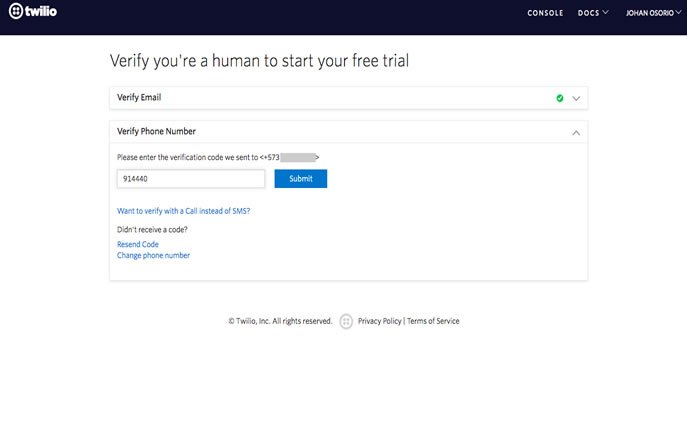
Verify you´re a human to start your free trial
- STEP 4: You must go to text messages and verify there the activation code of the cell phone number, in this way it would be active and ready to be used after other configurations for whatsapp.
My first Twilio account Dashboard
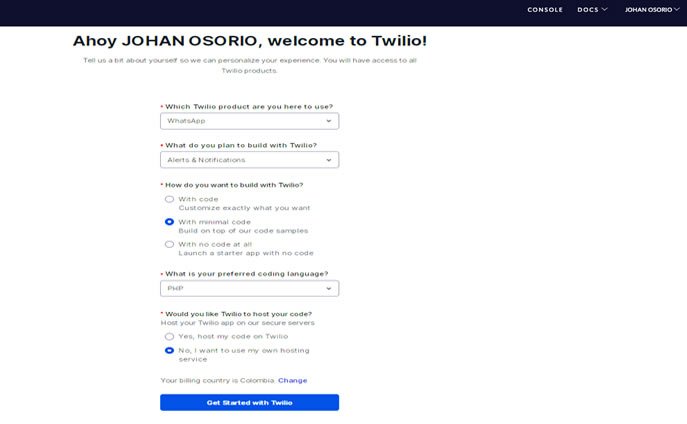
- STEP 5: For twilio it is very important to know what you want to do with the whatsapp api and therefore you must fill out the form as it is in the example:
Welcome to twilio
- STEP 6: After verifying all the email steps, Twilio cell phone activating your account, in this way you can enjoy your dashbaoar, normally you must take into account the ACCOUNT SID data later, it will be requested later to register with whatsapp and request authorization for your number .
Important to Note
-
From this moment, the most important thing to activate the whatsapp account begins and you must follow the following very important steps:
- In the left side menu click on PROGRAMMABLE MESSAGING
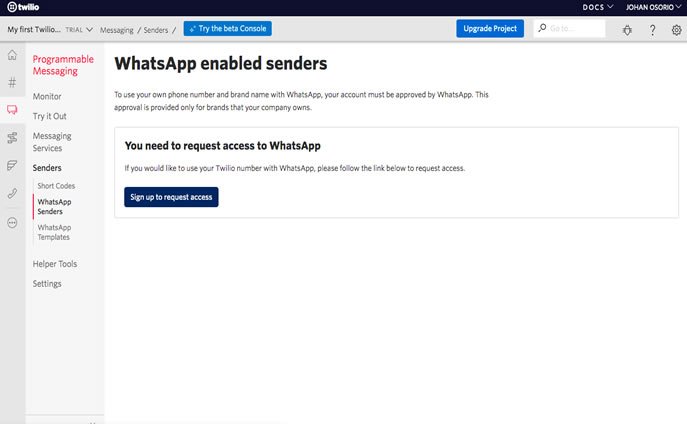
Whatsapp enabled senders
- STEP 7: In this step it should be taken into account that configuring the account well means that you will be very well, please follow the following steps:
Important to Note
-
When you click on these items you must go to the following link to fill it out and according to this you must provide the data that will be in some links, please read and this way everything will work out very well:
- Click on Senders
- Click on WhatsApp Senders
- Click on the button sign up to request access to go to the next questionnaire and thus activate your account number of whatsapp.
Request to enable your Twilio numbers for WhatsApp
This form must be filled out to obtain permission from the whatsapp company, you must configure the following apsos:
Please configure the following steps in this way the WhatsApp number will be available very soon to be used for notifications.
Create a free account on Twilio
- STEP 1: In this module you must fill in all the fields of the form, this implies that you can activate your whatsapp account, please follow the demo link to activate your whatsapp account.
- The first thing you will want to do is fill out the WhatsApp API request form located here:
- Have on hand the code TWILIO ACCOUNT SID: Your primary Twilio Account SID. To find your Account SID, log into the click the “Home” button, and locate your Account SID on the top right on the page. If this is a Flex account, use your Flex Project Sid.
- Facebook Business Manager ID: You can find this ID by , or logging into business.facebook.com > clicking “Business Settings” > "Business Info" > Look for the Business Manager ID.
- "I've completed Facebook Business Verification": Learn more about .
- "I understand Twilio can modify my SMS/Voice URL and that approval is only for the brand submitted": Twilio may momentarily use your Twilio number’s SMS or Voice URL to register your number with WhatsApp.
Version 6.3.0 - 10 Jul 2022 Latest Updated
- UPDATE:
- Added new module pre approved alerts
- New customer approved packages module
- New available inventory module
- New module normal shipments, Mass notifications selecting all users and notify the email of each client
- New module consolidated shipments, Mass notifications selecting all users and notify the email of each client
- FIXED: Fixed some minor bugs
Version 5.3.1 - 17 May 2022
- UPDATE:
- All shipping forms were optimized and updated
- The client, driver, employee and admin dashboards were improved
- FIXED: Fixed some minor bugs
Version 5.0.0 - 4th August 2021
- ADDED:
- Paypal, stripe, paystack payment api for shipments
- List of payments in all shipping modules, consolidated, packages,
- Redesign of the template in general and menu
- Input field declared value in shipments, multiple shipments, consolidated, online purchases, collected
- Minimum declared tax value to generate collection, configurable
- Full documentation for general configuration
- Advanced module SMTP and native PHP MAIL
- Custom EMAIL templates as email notification
- Advanced user registration module with multiple addresses
- Register senders with multiple addresses and receivers in all forms
- Dashboard client with registration of unique receivers
- Edit shipping form tracking
- Configuration module
- ADDED: Activate or deactivate (manage which payment gateways the system will use)
- Stripe
- Paypal
- Paystack
- ADDED: Online shopping module
- Pay with Stripe
- Pay with Paystack
- Payment with paypal
- payment attaching documents (vouchers) includes push notifications, register the payment in the db and all the necessary configurations in each gateway List of payments made
- ADDED: Modules internet purchases, shipments, collections, consolidated (in add, follow-up and deliveries) the option to send notification with Twilio Api for Whatssap was applied through a check where you decide whether to notify the sender or receiver.
- Internet shopping dashboard
- Create pre alerts
- Pre alert list create packages from pre alerts
- Create packages package details
- Edit packages
- Deliver package
- Print package and Labels
- Assign driver
- Send email
- Pay package (client side) and verify payment (admin side)
- MASSIVE ASSIGN DRIVER IN ALL FORMS
- ALL WITH ITS RESPECTIVE NOTIFICATIONS
- online shopping reports -general / listing / excel / print -by employees / listing / excel / print -by driver / listing / excel / print -by agency / listing / excel / print
- Require and update sender and recipient customer data in all shipping / collection / consolidated / package forms. Add reissue field in all shipping / collection / consolidated / package forms
- Customizable pound price field on all shipping / pickup / consolidated / package forms


